As autumn transitions to winter across the UK, boat owners face the crucial task of preparing vessels for the harsh, cold months ahead. For owners of inflatable boats, whether Honwave, Seago, Talamex or other brands, proper winter care is essential for ensuring your investment provides many seasons of reliable service. This comprehensive guide walks you through every aspect of winterising your inflatable boat, from cleaning and inspection to storage techniques that prevent damage and extend lifespan.

Why Winter Care Matters for Inflatable Boats
Inflatable boats constructed from PVC or Hypalon are remarkably durable, but winter conditions pose unique challenges. Freezing temperatures can make materials brittle and prone to cracking. Ice formation inside inadequately drained boats can stress seams and fabric. Moisture trapped during storage creates ideal conditions for mildew growth, causing unpleasant odours and material degradation. UV exposure, even during winter months, continues to break down fabric over time. Rodents seeking shelter may chew through fabric, creating expensive damage. Perhaps most critically, improper folding and storage techniques can create permanent creases and stress points that eventually develop into leaks.
The good news? With proper preparation requiring just a few hours of effort, your inflatable boat will emerge from winter storage in spring looking and performing as well as when you put it away. Let's explore the complete winterisation process step by step.
Step 1: Thorough End-of-Season Cleaning
Proper winter storage begins with immaculate cleaning. Never store a dirty inflatable boat, organic matter, salt, and dirt accelerate material degradation during storage.
Saltwater Boats
If you've used your boat in saltwater, this step is absolutely critical. Salt crystals act as abrasives, grinding away at fabric fibres and creating weak points. Begin by inflating the boat fully to working pressure, cleaning is much more effective on a properly inflated surface. Use a garden hose with good pressure to rinse every surface thoroughly, paying particular attention to tube bottoms where sand and salt accumulate heavily, valve areas where salt crystals hide in crevices, D-rings and attachment points, transom and mounting hardware, floor components including joints and hinges, and the inside of the boat where water, fish scales, or debris may have collected.
After rinsing, mix warm water with mild marine boat soap or automotive wash solution. Avoid harsh detergents, petroleum-based cleaners, or abrasive chemicals which can damage PVC or Hypalon. Using a soft brush or sponge, scrub all surfaces systematically. For stubborn stains or marks, specialised inflatable boat cleaners like Starbrite Inflatable Boat Cleaner work excellently without damaging materials. Black scuff marks from fenders or shoes often respond to gentle rubbing with a magic eraser-style melamine foam pad.
Freshwater Boats
Boats used exclusively in freshwater still require thorough cleaning, though the process is somewhat simpler. Organic matter including algae, fish slime, and mud must be completely removed. Pay special attention to areas under seats and in corners where debris accumulates. Even freshwater boats benefit from mild soap cleaning to remove oils, sunscreen residue, and general grime.
The Drying Phase
Once cleaned, your boat must dry completely before storage, this cannot be overstated. Moisture trapped during storage guarantees mildew problems. After rinsing thoroughly to remove all soap residue, open all drain plugs and tip the boat to ensure water drains completely. Use towels to dry accessible areas, but most drying will occur through air circulation. Leave the boat inflated in a well-ventilated area for at least 24-48 hours. Choose a location protected from direct sunlight but with good air movement, a garage with doors open, a covered patio, or a shaded driveway work well. Rotate the boat occasionally to ensure all surfaces dry. Check inside all lockers, under seats, and in any pockets or compartments. Feel inside valves, they must be bone dry before storage.
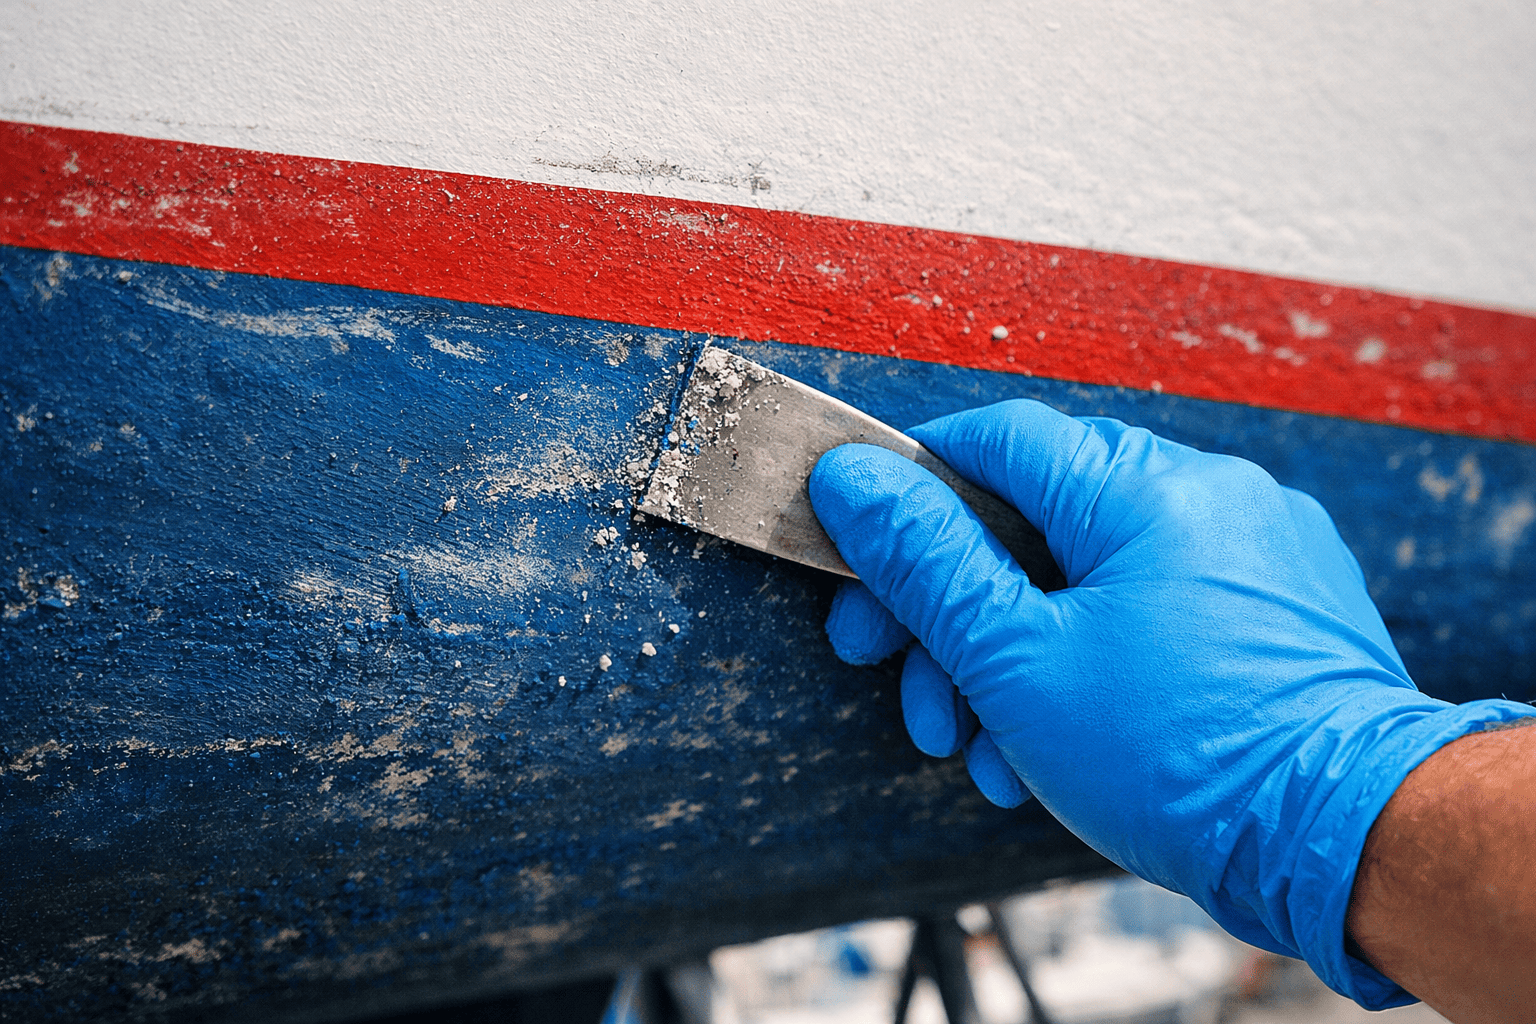
Step 2: Comprehensive Damage Inspection
With your boat clean and dry, conduct a methodical inspection while it's still fully inflated. This is far easier than discovering problems next spring when you're eager to launch.
What to Check
Examine all seams carefully, looking for any separation, particularly where tubes join each other and at transom connections. Small seam issues are easily repaired now but can become major problems if left over winter. Inspect the entire tube surface for cuts, punctures, abrasions, or thin spots, run your hands over all surfaces, feeling for irregularities. Check all valves by inflating chambers to maximum pressure and applying soapy water around valve assemblies, bubbles indicate air leaks requiring attention. Examine D-rings, handles, and oarlocks for secure attachment and signs of pulling away from fabric. Inspect transom condition on motorboat models, looking for cracks, delamination, or loose fittings. Review floor components whether slatted, aluminium, or air deck types for damage, warping, or connection problems. Assess rubbing strakes and wear patches, particularly on tube bottoms, for excessive wear.
Addressing Issues Now
Any problems discovered should be addressed before storage when possible. Small punctures and tears under 50mm can usually be repaired using PVC or Hypalon repair kits available from chandleries. The process involves cleaning and roughening the area, applying appropriate adhesive, pressing on a patch, and allowing proper curing time per manufacturer instructions. Valve issues often require specialised valve wrenches for tightening or replacement, these are inexpensive tools worth owning. For more extensive damage, consider professional repair from inflatable boat specialists who have heat welding equipment and expertise for complex repairs. It's far better to arrange repairs during winter when workshops are less busy than discovering problems minutes before a planned outing next season.
Step 3: Protective Treatment Application
Before deflation and storage, apply protective treatments that guard against UV damage and oxidation during the storage period. Products like 303 Aerospace Protectant are specifically formulated for marine vinyl and provide excellent protection. These treatments are not just for show, they genuinely extend material life by preventing the UV and chemical degradation that continues even in storage.
Apply protectant to clean, dry surfaces following product instructions. Use a soft cloth to apply a thin, even coat to all exterior tube surfaces, transom areas, and any exposed fabric or vinyl. Don't over-apply, more is not better and can create sticky surfaces that attract dust. Allow the treatment to dry completely per product instructions before deflation. Many protectants also help prevent mildew growth, an added benefit for long-term storage. Some boat owners apply protectant twice, once in autumn before storage and again in spring before launching. This isn't strictly necessary but does provide maximum protection.
Step 4: Proper Deflation Technique
How you deflate your inflatable boat matters more than many owners realise. Proper deflation technique prevents stress points and creases that can become permanent weak spots.
Begin by opening all valves to allow air to escape gradually rather than forcing deflation, which can stress seams and fittings. Start with the main tubes, allowing them to deflate naturally to the point where they're soft but not completely flat. Avoid pressing or standing on tubes to force air out quickly, let gravity and time do the work. Once tubes are mostly deflated, gently fold or roll the boat following the manufacturer's recommendations if provided. The goal is loose, gentle folds rather than tight creases. Never fold along the same lines repeatedly season after season, vary fold patterns slightly to prevent wear lines.
For boats with removable floor components, these should be removed, cleaned, dried, and stored separately. Aluminium floors should be stacked flat with cardboard or cloth between sections to prevent scratching. Slatted floors can be disassembled and stored in bags. Air deck floors should be deflated, cleaned, dried, and rolled loosely.
Step 5: Ideal Storage Conditions
Where and how you store your inflatable boat through winter dramatically impacts its condition come spring. Optimal storage provides protection from temperature extremes, moisture, sunlight, and pests.
Location Selection
The ideal storage location is cool, dry, and protected from the elements. Heated garages work well, though avoid placing boats directly adjacent to furnaces or other heat sources, temperature consistency matters more than specific temperature. Unheated but dry garages, sheds, or basements are excellent provided they don't experience extreme cold or dampness. Avoid storing directly on concrete floors which can transfer moisture, place boats on pallets, shelving, or at minimum on plastic sheeting. If outdoor storage is unavoidable, use high-quality waterproof covers with ventilation to prevent condensation buildup, but recognise this is a compromise solution inferior to indoor storage.
Storage Position
Deflated boats should be stored loosely folded or rolled rather than tightly compressed. Tight compression creates stress on fabric and seams. Many manufacturers provide storage bags, use these when available, ensuring the boat is completely dry before enclosing. Place folded boats on shelves or suspended from ceiling storage rather than stacked under heavy items. Store away from chemicals including paints, solvents, fuels, and cleaning agents whose fumes can damage PVC and Hypalon over time. Keep away from areas where rodents are active, mice and rats will readily chew through inflatable boat fabric seeking nesting material or simply because it's in their way.
Alternative: Inflated Storage
Some boat owners with adequate space prefer storing boats partially inflated. This approach eliminates creases and fold stress entirely. If choosing this method, inflate to approximately 50-70% capacity, not full working pressure which stresses materials during temperature fluctuations. Cover the boat with breathable tarps or specialised boat covers that protect from dust and UV while allowing air circulation. Ensure the storage area is well-ventilated and check periodically through winter to maintain proper inflation. This method works particularly well for boats stored in boat houses or large garages but requires significantly more space than deflated storage.
Step 6: Floor and Component Care
Inflatable boat floors require specific winter care depending on their construction type.
Slatted Floors
Wooden or composite slatted floors should be cleaned, dried thoroughly, and inspected for cracks, warping, or damaged connectors. Store flat in dry conditions. Some boat owners apply wood preservative or marine varnish to wooden slats annually to prevent water absorption and extend life. Stack slats with spacers between them to promote air circulation, preventing moisture accumulation.
Aluminium Floors
Aluminium floor sections should be cleaned of all salt and dirt, dried completely, and stored flat. Place cardboard, cloth, or foam between sections when stacking to prevent surface scratching. Check all connection points, hinges, and fasteners for corrosion or damage. Apply light oil or corrosion inhibitor to hinges and moving parts. Store in dry locations, while aluminium doesn't rust, it can corrode in persistently damp conditions.
Air Deck Floors
High-pressure air deck floors should be deflated completely, cleaned and dried thoroughly, and rolled loosely for storage. Avoid tight folding which can stress internal construction. Store in moderate temperature locations as extreme cold can affect air bladders and valves. Inspect valves before storage, ensuring they're clean and function properly.
Step 7: Accessory and Equipment Storage
Don't forget the various accessories and equipment associated with your inflatable boat.
Oars and Paddles
Clean oars or paddles with fresh water, checking for cracks or stress points. Store horizontally in dry locations rather than leaning against walls which can create warping. Apply light oil to oarlocks and metal fittings to prevent corrosion.
Pumps
Manual pumps should be cleaned, dried, and stored in dry locations. Check hoses for cracks and ensure valves and connections function smoothly. Apply silicone spray to pump cylinders and pistons to prevent corrosion and ensure smooth operation next season. Electric pumps require similar care with additional attention to battery condition and electrical connections.
Seat Cushions and Covers
Removable seat cushions and covers should be cleaned according to material type, dried completely, and stored in breathable bags or containers. Avoid plastic bags which trap moisture. Some boat owners wash cushion covers in washing machines (if material allows) before storage.
Safety Equipment
Life jackets, throw ropes, anchors, and other safety equipment should be inspected, cleaned, and stored properly. Life jackets need dry storage in uncompressed conditions to maintain buoyancy effectiveness. Check expiration dates on flares and other time-sensitive safety equipment.
Step 8: Documentation and Planning
Before completely finishing your winterisation process, take time for important documentation and planning.
Record Keeping
Note any maintenance performed, issues discovered, or repairs needed. Photograph any damage or wear areas for reference. Record valve positions and inflation pressures for reference next season. Update your boat's maintenance log including hours used, locations visited, and any problems experienced.
Parts and Supplies Planning
Create a list of any parts, supplies, or equipment needed for next season. This might include replacement valves, patch kits, new oars, updated safety equipment, or anything else you noticed lacking this season. Ordering parts during winter often provides better availability and sometimes better prices than spring rush periods.
Insurance and Registration
Review your boat insurance policy to ensure coverage remains appropriate. Some policies require notification of winter storage locations. Check registration requirements and renewal dates, handling these during winter avoids spring rushes.
Special Considerations for Different Climates
The UK's varied climates require slight adaptations to winter storage approaches.
Mild Coastal Regions
In milder UK coastal areas where hard freezes are rare, the primary concerns are moisture and UV exposure. Ensure particularly thorough drying before storage as mould and mildew develop more readily in mild, damp conditions. Consider dehumidifiers in storage areas if dampness persists. UV protection remains important even during winter in these regions.
Highland and Northern Regions
In Scotland and northern England where harsh winters and deep freezes occur, protect boats from extreme cold which can make PVC brittle. Store in insulated spaces when possible. Avoid opening or handling boats during extreme cold snaps when material flexibility is reduced. Ensure storage areas don't experience freeze-thaw cycles which promote condensation and moisture problems.
Common Winter Storage Mistakes to Avoid
Learning from others' mistakes can save you problems and expense. Common winter storage errors include:
Storing wet or damp boats – This is perhaps the single most common mistake, inevitably leading to mildew, staining, and unpleasant odours. Always ensure complete drying before storage, even if this means delaying storage for an extra day or two.
Using inappropriate cleaning products – Harsh chemicals, petroleum-based cleaners, and abrasive tools can damage inflatable boat materials. Stick with mild soaps and specialised marine products.
Tight folding or compression – Creating sharp creases and folds stresses fabric and seams, eventually creating weak points and leaks. Fold loosely and vary fold patterns.
Neglecting valves – Dirty or corroded valves cause problems. Clean valves thoroughly and ensure they're dry before storage.
Storing in extreme temperatures – Extreme heat or cold accelerates material degradation. Choose moderate, stable temperature storage locations.
Ignoring rodent protection – One winter with rodent activity can destroy an inflatable boat. Store away from rodent-prone areas or use appropriate deterrents.
Skipping damage inspection – Small problems become big problems if left unaddressed over winter. Inspect thoroughly before storage.
Storing under heavy items – Placing heavy equipment on top of folded boats creates pressure points and stress. Store where boats won't be compressed by other storage items.
Spring Preparation: Bringing Your Boat Back to Life
When spring arrives and you're ready to launch again, proper recommissioning ensures your boat performs optimally.
Remove your boat from storage and unfold or unroll it carefully. Inspect all surfaces, seams, and valves before inflation, look for any winter damage including rodent activity, mildew, or material deterioration. Inflate gradually to working pressure and allow the boat to "settle" for 24 hours, seams and fabric need time to adjust after being folded for months. Conduct a thorough air retention test by inflating to maximum pressure and checking after 24 hours, pressure should drop minimally if at all.
Clean the boat again if any storage dust or dirt has accumulated. Apply fresh protective treatment like 303 Aerospace Protectant to all exterior surfaces. Inspect and test all valves for proper function. Reinstall floor components, checking all connections and fittings. Test all accessories including pumps, oars, and safety equipment. Consider a shakedown voyage in calm, shallow water before venturing to more challenging conditions, this allows you to verify everything works properly without risk.
Investment Protection Through Proper Care
Your inflatable boat represents a significant investment in maritime recreation, fishing, or practical transportation. Whether you own a premium Honwave, value-oriented Seago, or another brand, proper winter care ensures this investment provides decades of reliable service. The few hours spent on thorough cleaning, inspection, and proper storage pay dividends season after season through preserved appearance, maintained performance, and prevention of expensive repairs.
Winter boat care isn't merely about protecting material and equipment, it's about ensuring safety and reliability when you return to the water. A well-maintained boat responds properly in emergencies, holds air pressure consistently, and doesn't let you down miles from shore. It's about maximizing your enjoyment of boating without worrying about equipment failure or discovering problems that could have been prevented.
As you prepare your inflatable boat for winter storage, remember that each step, thorough cleaning, complete drying, careful inspection, proper deflation, and ideal storage conditions, contributes to long-term health and performance. These aren't burdensome chores but rather stewardship of equipment that brings joy, adventure, and utility to your life on the water.
When spring arrives and you're eager to launch again, you'll appreciate the effort invested in proper winter care. Your boat will inflate without issues, hold pressure perfectly, show no signs of mildew or degradation, and perform as reliably as the day you stored it. That peace of mind and trouble-free boating experience is the reward for winter care done properly.
For additional guidance on inflatable boat care, selection of proper storage products, or answers to specific winterisation questions, the experienced team at Seamark Nunn is always available to assist. We're committed to helping you enjoy maritime pursuits for years to come through expert advice, quality equipment, and comprehensive support.
Fair winds and following seas await next season, proper winter care ensures your inflatable boat is ready when you are.