Setting up a boat with outboard propulsion is one of the most practical and rewarding ways to get on the water. Inflatable boats, in particular, offer a versatile and lightweight craft suitable for everything from family days out to coastal cruising and water activities with friends.
Whether you’re new to boating this year or upgrading your setup, understanding how to properly attach and configure your outboard motor is essential for safety, performance, and long term reliability especially if you are using an electric or a second-hand outboard.
This guide will discuss the key steps to ensure your inflatable boat and outboard combination is efficient, stable and ready for use.

Choosing the Correct Shaft Length
Before attaching your engine, it’s crucial to select the correct shaft length for your inflatable boat. This is one of the most overlooked factors, yet it has a major impact on performance and safety. Most inflatable boats are designed for either a short shaft (15”) or long shaft (20”) outboard. Using the wrong size can lead to poor propulsion, excessive spray, or even damage to the engine.
The cavitation plate of the motor should sit level with the bottom of the boat’s transom. If it sits too high, the propeller may ventilate and lose grip in the water. Too low, and you’ll experience drag, reduced fuel efficiency and sluggish handling. When browsing a suitable boat outboard, always check the website for manufacturer’s specifications for compatibility.
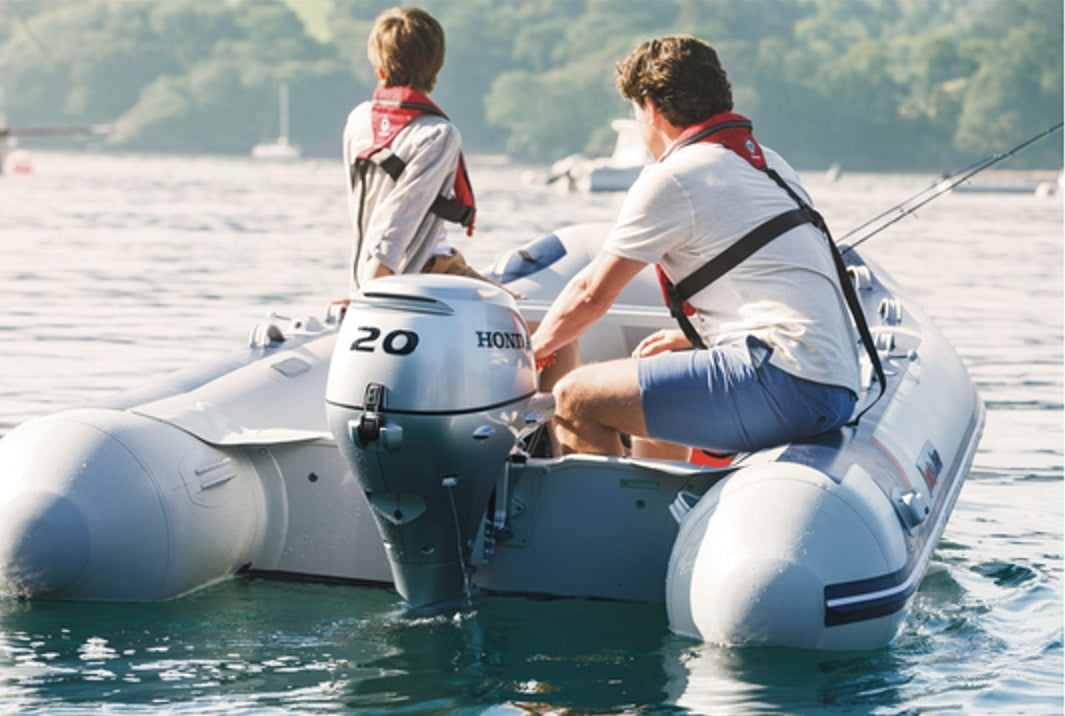
Securing the Engine to the Transom
Once you have the correct shaft length, the next step is attaching the outboard securely to the transom. This is where stability and safety begin. Carefully lift the engine onto the transom, ensuring it is centred and aligned. Most outboards, including popular brands like Mercury and Suzuki, come with clamp screws that tighten onto the transom.
Tighten these clamps firmly by hand, ensuring the engine cannot shift during operation. For additional security, especially when cruising or using higher powered motorboats, attach a safety retaining line or chain between the engine and the boat. This acts as a backup in case the clamps loosen.
Proper installation here not only protects your investment but also ensures smooth handling when underway, particularly in choppier conditions or when carrying family and gear.
Positioning the Fuel Tank and Connecting Lines
Fuel system setup is another key part of preparing your boat for use. Portable fuel tanks should be placed in a secure, well ventilated position within the boat, ideally towards the stern but balanced to maintain even weight distribution.
Connect the fuel line from the tank to the outboard, ensuring the fittings click securely into place. Before starting the engine, use the primer bulb to pump fuel through the line until it becomes firm. This ensures the engine receives fuel immediately upon startup.
Modern outboards from brands like Suzuki and Mercury have different models designed with efficiency in mind, helping extend your cruising range while reducing fuel consumption. Proper fuel line setup contributes directly to these advantages.

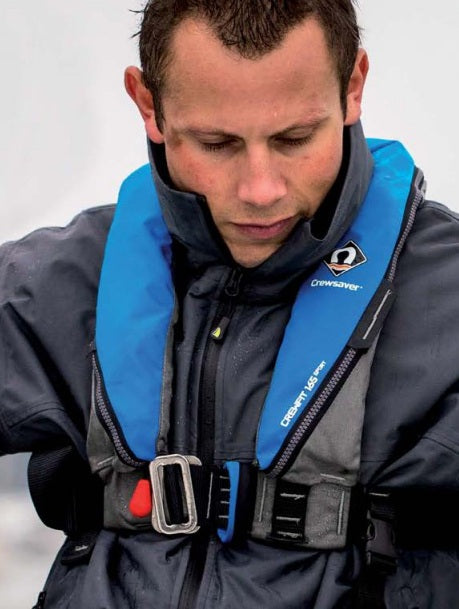
Connecting Essential Safety Features
Safety should never be an afterthought when setting up any powerboats or motorboats. One of the most important features to connect is the kill cord (also known as a kill switch lanyard). This attaches to the driver and immediately stops the engine if they are thrown from the helm.
Additionally, ensure your outboard is in neutral before starting, and check that all passengers understand basic onboard safety. Inflatable boats are often used for family outings, so taking a few extra moments to secure these features can make a significant difference.
Adjusting Trim for Performance and Efficiency
Once your outboard is attached and running, fine tuning the trim is what transforms a basic setup into a smooth, efficient craft. Trim refers to the angle of the outboard motor relative to the boat. Adjusting this correctly improves speed, fuel efficiency, and overall stability.
When the motor is trimmed too far in (towards the transom), the boat may plough through the water, reducing speed and increasing fuel usage. If trimmed too far out, the bow may rise excessively, causing instability. The ideal position allows the boat to plane smoothly, with minimal drag and a comfortable ride.
Finding the right trim setting may take some experimentation, especially when carrying different loads or cruising in varying conditions. Over time, you’ll develop a feel for what works best for your specific inflatable boat and outboard combination.
Final Thoughts on Setting Up Your Boat with Outboard
Attaching and setting up an outboard on an inflatable boat doesn’t need to be complicated, but it does require attention to detail. From choosing the correct shaft length to securing the engine, positioning the fuel tank, and adjusting trim, each step plays a role in ensuring a safe and enjoyable experience on the water.
A well configured boat with outboard offers incredible versatility, whether you’re exploring inland waterways, heading out for coastal cruising, or simply enjoying time with family. With the right setup, you’ll benefit from improved performance, greater fuel efficiency, and the confidence that your craft is ready for whatever the season brings.
Choosing a trusted stockist like Seamark Nunn ensures you’re getting expert advice, high quality products, and reliable aftercare to support you throughout your boating journey. With decades of experience and a wide range of models of powerboats, outboards, and marine equipment, they can help you find the right setup for your needs, giving you confidence every time you set sail. You can also contact them if you have any questions regarding your setup.